How to Maintain an Electric Deep Fryer with Oil Filtration
Keeping your kitchen equipment in excellent condition ensures better cooking results and longer-lasting appliances. An electric deep fryer represents a significant investment, particularly models with advanced features like oil filtration systems. Understanding proper maintenance techniques will help you maximize this investment while ensuring safe, delicious fried foods every time you cook.
Modern deep fryers have evolved significantly from their basic predecessors. Today’s models offer sophisticated features that make maintenance easier and more effective. However, these features only work well when you understand how to use and care for them properly. This comprehensive guide will walk you through everything you need to know about maintaining your electric deep fryer with oil filtration capabilities.
Understanding Your Deep Fryer Components
Before diving into maintenance procedures, you should familiarize yourself with the key components of your appliance. Most electric deep fryers consist of several essential parts that work together to deliver perfectly fried foods.
The heating element is the heart of your fryer. It heats the oil to precise temperatures and maintains that heat throughout cooking. This component requires minimal direct maintenance but benefits greatly from keeping the surrounding areas clean.
The thermostat controls temperature regulation. Modern units feature digital controls that offer precise temperature settings. These systems rely on sensors that must remain clean and unobstructed to function accurately.
The oil filtration system is perhaps the most important feature for maintenance purposes. This system typically includes a filtering mechanism that removes food particles and debris from the oil. Some systems operate automatically, while others require manual activation.
Understanding these components helps you approach maintenance systematically. Each part has specific care requirements that contribute to overall appliance longevity.
Daily Cleaning Routines for Best Results
Establishing a daily cleaning routine prevents buildup and keeps your fryer operating efficiently. These simple steps take only a few minutes but make a tremendous difference in performance and longevity.
After each use, allow the oil to cool to a safe handling temperature. Never attempt to clean or maintain your fryer while the oil is hot. Waiting might seem tedious, but safety must always come first.
Once cooled, remove any large food particles floating on the surface using a slotted spoon or skimmer. These particles break down quickly in hot oil and accelerate degradation. Removing them daily extends oil life significantly.
Wipe down the exterior surfaces with a damp cloth. Pay special attention to control panels and handles, where grease and food residue accumulate. Use mild dish soap for stubborn spots, but avoid harsh chemicals that might damage finishes.
Clean the lid thoroughly after each use. Steam and oil vapors condense on the lid, creating sticky residue that attracts dust and becomes difficult to remove if left for extended periods. A quick wipe prevents this buildup.
Additionally, check the area around the fryer for oil splatter. Cleaning these spots immediately prevents them from hardening and becoming permanent stains on countertops or floors.
Operating the Oil Filtration System
The oil filtration feature distinguishes modern fryers from basic models. Learning to use this system properly maximizes oil quality and reduces replacement frequency.
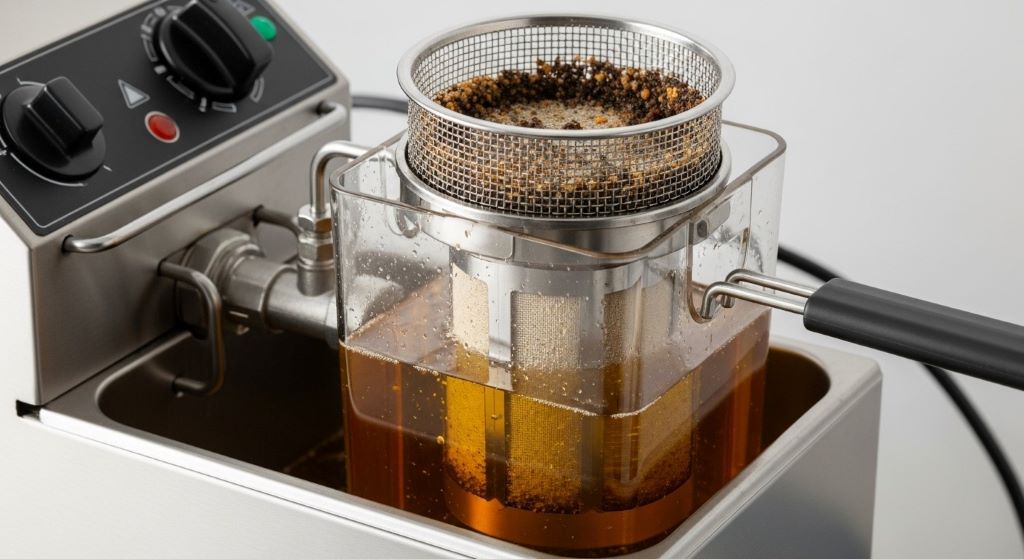
Most filtration systems work by pumping oil through a fine mesh or paper filter that captures food particles and debris. This process can typically be performed while the oil is still warm, though you should always consult your specific model’s instructions.
To begin filtration, ensure the stainless steel deep fryer is positioned on a stable, level surface. Activate the filtration system according to your manufacturer’s guidelines. Some models feature automatic filtration that runs after each use, while others require manual activation.
During filtration, the system pumps oil from the cooking chamber through the filter and back into the vessel. This process might take several minutes, depending on oil volume and system design. Never interrupt the filtration cycle once started.
After filtration completes, check the filter for accumulated debris. This debris indicates the system is working properly. Replace or clean the filter according to manufacturer recommendations. Some systems use disposable filters, while others feature reusable screens that require washing.
The removable oil container fryer design makes this process much easier. You can detach the container, making access to filters and internal components straightforward. This accessibility simplifies maintenance and encourages regular upkeep.
Deep Cleaning Your Electric Fryer
While daily maintenance handles surface cleaning, periodic deep cleaning is essential for optimal performance. Plan to perform a thorough cleaning every few weeks, depending on usage frequency.
Start by completely draining the oil. If the oil is still usable, store it in a clean, airtight container in a cool, dark place. If the oil has darkened, smells rancid, or foams excessively, dispose of it properly. Never pour oil down drains, as it causes plumbing problems.
Once drained, remove all detachable components. Most modern fryers feature removable baskets, lids, and sometimes the entire cooking vessel. The removable oil container fryer design particularly simplifies this step.
Fill a sink with hot, soapy water and submerge the removable parts. Let them soak for 15 to 20 minutes to loosen baked-on residue. Use a soft sponge or cloth to clean these components, avoiding abrasive scrubbers that might scratch surfaces.
For the main unit, never immerse electrical components in water. Instead, wipe the interior with a damp cloth and mild detergent. For stubborn spots, create a paste from baking soda and water. Apply this paste, let it sit for a few minutes, then wipe clean.
Pay particular attention to the heating element area. Food particles and oil residue accumulate here and can cause burning smells during subsequent uses. Clean this area gently but thoroughly, ensuring no detergent residue remains.
Maintaining Oil Quality Between Changes
Oil quality directly impacts food taste and your fryer’s performance. Therefore, proper oil maintenance between complete changes is crucial for consistent results.
Filter the oil after every use if possible. At minimum, filter after every two or three uses. This frequency prevents particle accumulation that degrades oil quality and creates off-flavors in food.
Store oil properly when not in use. If you use your fryer infrequently, consider removing the oil between uses. Store it in a sealed container away from light and heat. Exposure to air, light, and heat accelerates oil breakdown.
Monitor oil appearance and smell regularly. Fresh oil appears light golden and has a neutral smell. As oil degrades, it darkens, becomes thick, and develops an unpleasant odor. Replace oil showing these signs regardless of filtration frequency.
Avoid mixing different oil types. Each oil has distinct properties and smoke points. Combining oils can create unpredictable results and accelerate degradation. Stick with one oil type for best results.
Keep water away from your oil. Even small amounts of water cause oil to splatter dangerously when heated. Ensure all food items are dry before frying, and wipe any condensation from the lid before placing it on the fryer.
Preventing Common Maintenance Issues
Many fryer problems stem from inadequate maintenance. Understanding common issues helps you prevent them before they become serious problems.
Heating element failure often results from residue buildup. This buildup acts as insulation, forcing the element to work harder and eventually burn out. Regular cleaning prevents this costly repair.
Thermostat malfunction can occur when sensors become coated with grease or food particles. These obstructions prevent accurate temperature readings, leading to undercooked or overcooked food. Keeping sensor areas clean maintains temperature accuracy.
Oil overflow typically happens when the stainless steel deep fryer is overfilled or when food releases excessive moisture. Always follow maximum fill lines, and pat food dry before frying to prevent overflow incidents.
Electrical problems often trace back to moisture exposure. Never allow water near electrical components, and ensure the fryer is completely dry before plugging it in after cleaning.
Additionally, unusual noises during operation usually indicate mechanical issues with the filtration system or heating element. Address these sounds promptly by checking for obstructions or contacting customer service.
Seasonal and Long-Term Storage
If you don’t use your fryer regularly, proper storage protects it from damage and ensures it’s ready when needed.
Before storing, perform a complete deep cleaning. Remove all oil and ensure every component is thoroughly clean and dry. Any residual oil or moisture can become rancid or cause rust during storage.
Disassemble removable parts and store them separately. This prevents pressure points that might cause warping or damage over time. Wrap delicate components in soft cloth for added protection.
Store the fryer in a cool, dry location away from temperature extremes. Garages and outdoor sheds might experience humidity and temperature fluctuations that damage electrical components.
Cover the fryer with a clean cloth or the original packaging to protect it from dust. Dust accumulation in electrical components can cause problems when you restart the appliance.
Before using after extended storage, inspect all components carefully. Look for signs of rust, damage, or pest activity. Test the fryer with just oil before cooking food to ensure everything functions properly.
Troubleshooting Filtration System Problems
Even with proper maintenance, filtration systems occasionally develop issues. Knowing how to troubleshoot common problems saves time and frustration.
If the filtration system won’t activate, first check that the fryer is properly assembled. Many systems include safety interlocks that prevent operation when components aren’t correctly positioned. Ensure the removable oil container fryer components are properly seated.
Slow filtration typically indicates a clogged filter. Replace or clean the filter according to manufacturer instructions. If problems persist after filter replacement, check for obstructions in the pump or tubing.
Strange noises during filtration might suggest air in the system or mechanical wear. Running a filtration cycle without oil can help purge air bubbles. If noises continue, contact customer support for guidance.
Incomplete filtration, where some oil remains unfiltered, often results from improper positioning or low oil levels. Ensure the fryer sits level and oil levels meet minimum requirements for filtration system operation.
Leaking during filtration requires immediate attention. Stop the system, allow everything to cool, and check all seals and connections. Replace any damaged seals before using the fryer again.
Selecting the Right Cleaning Products
Using appropriate cleaning products protects your fryer’s surfaces while ensuring thorough cleaning. The wrong products can damage finishes or leave harmful residues.
Mild dish soap works well for most cleaning tasks. It cuts through grease effectively without harming surfaces. Avoid antibacterial soaps with harsh chemicals that might leave residues in areas that contact food.
Baking soda serves as an excellent gentle abrasive for stubborn spots. It’s food-safe, non-toxic, and won’t scratch surfaces. Create a paste for targeted cleaning of problem areas.
White vinegar helps remove mineral deposits from heating elements and interior surfaces. Dilute it with water and use sparingly, as acidic cleaners can damage certain materials if left on too long.
Commercial fryer cleaners are available but often unnecessary for home units. If you choose to use these, select products specifically designed for home appliances and follow all safety instructions carefully.
Never use oven cleaner, steel wool, or harsh abrasive cleaners on your fryer. These products can scratch surfaces, damage non-stick coatings, and contaminate food-contact surfaces with harmful chemicals.
Extending Your Fryer’s Lifespan
Proper maintenance naturally extends appliance life, but additional habits can maximize longevity even further.
Avoid overloading the fryer basket. Excessive food volume lowers oil temperature dramatically, forcing the heating element to work harder. This strain accelerates wear and potentially shortens appliance life.
Use the correct oil for your cooking needs. Different oils have different smoke points. Using oil beyond its smoke point creates harmful compounds and accelerates both oil and equipment degradation.
Never leave the fryer unattended while operating. Besides safety concerns, monitoring allows you to catch problems early before they cause damage. Watch for unusual sounds, smells, or performance changes.
Follow the manufacturer’s recommended maintenance schedule. These guidelines are based on extensive testing and represent the minimum care required for optimal performance and longevity.
Keep your owner’s manual accessible for reference. These documents contain specific information about your model that generic guides cannot provide. Refer to it whenever questions arise about proper care or operation.
Environmental Considerations
Responsible fryer maintenance includes environmental awareness, particularly regarding oil disposal and energy use.
Used cooking oil should never go down drains or into trash bins. Many communities offer oil recycling programs that convert used oil into biodiesel. Check local resources for drop-off locations.
If recycling isn’t available, solidify oil before disposal. Mix it with absorbent materials like cat litter or coffee grounds, seal it in a container, and place it in regular trash.
Energy efficiency matters too. Modern electric fryers use substantial electricity. Therefore, minimize preheat time by using correct temperature settings and batch cooking when possible.
Clean fryers operate more efficiently than dirty ones. Residue buildup forces heating elements to work harder, consuming more energy. Regular maintenance thus reduces both your electric bill and environmental impact.
Additionally, proper maintenance extends appliance life, reducing waste from premature replacement. Every year you extend your fryer’s service life represents one less appliance in landfills.
Professional Servicing and Warranty Considerations
Some maintenance tasks require professional attention. Understanding when to call experts protects both your appliance and your investment.
Electrical issues should always be handled by qualified technicians. Attempting DIY electrical repairs can void warranties and create serious safety hazards. If your fryer won’t heat, won’t turn on, or shows signs of electrical problems, seek professional help.
Many manufacturers offer extended warranty programs. These programs often include professional maintenance services. Review your warranty terms to understand what’s covered and what maintenance might be required to maintain coverage.
Keep records of all maintenance performed. Documenting your care routine can be valuable if warranty claims arise. Some warranties specifically require proof of proper maintenance.
Register your appliance with the manufacturer. Registration ensures you receive important safety notices and updates about your specific model. It also streamlines warranty claims if needed.
Never attempt to disassemble sealed components or electrical systems. These areas are specifically designed to be maintenance-free and should only be accessed by trained technicians.
Conclusion
Maintaining an electric deep fryer with oil filtration requires consistent attention but rewards you with better-tasting food and longer appliance life. Daily cleaning routines prevent buildup, while regular deep cleaning addresses accumulated residue. The oil filtration system represents a valuable feature that extends oil life when used correctly.
Understanding your specific model’s components and requirements is essential. The stainless steel deep fryer construction and removable oil container fryer design found in modern units simplify maintenance significantly. These features make cleaning and upkeep more accessible for home cooks.
Remember that proper oil maintenance directly impacts both food quality and equipment longevity. Filter regularly, monitor oil condition, and replace when necessary. These simple practices prevent many common problems and ensure consistent cooking results.
By following the guidelines outlined in this article, you’ll protect your investment and enjoy delicious fried foods for years to come. Maintenance might seem time-consuming initially, but establishing routines makes it second nature. Your efforts will be rewarded with reliable performance and exceptional results every time you cook.
Frequently Asked Questions
How often should I completely change the oil in my deep fryer?
Change oil after eight to ten uses for light cooking or sooner if it darkens, smells off, or foams excessively. The filtration system extends oil life, but filtration cannot restore oil that has chemically broken down. Monitor appearance and smell rather than relying solely on use count to determine when replacement is necessary.
Can I put deep fryer parts in the dishwasher?
Check your owner’s manual first, as this varies by model and manufacturer. Many removable baskets and containers are dishwasher-safe, but some components might warp or discolor in high heat. When in doubt, hand washing with hot soapy water is always safe and effective for all components.
Why does my fryer smoke even with clean oil?
Smoking typically indicates oil temperature exceeding its smoke point or residue on the heating element. Ensure you’re using oil appropriate for deep frying temperatures. Clean the heating element area thoroughly, as even small amounts of carbonized residue can create smoke when heated.
How do I know when the filtration system needs repair?
Warning signs include unusual noises during filtration, incomplete oil circulation, visible leaks, or error messages on digital displays. If filtration takes significantly longer than normal or the system won’t activate at all, professional servicing may be required. Always consult your warranty before attempting repairs.
Is it safe to reuse filtered oil multiple times?
Yes, properly filtered oil can be reused multiple times safely. However, filtration removes particles but doesn’t reverse chemical breakdown. Monitor oil quality through appearance, smell, and performance. Even well-filtered oil eventually degrades and requires replacement. Never reuse oil that appears dark brown, smells rancid, or creates excessive foam.
Related Topics:
Economical Kitchen Countertops: Affordable Options for a Stunning Kitchen
From Concept to Completion Seamless Kitchen Renovation Solutions